
Explosion Network may receive a commission when you purchase something via a link on our site
Call of the Sea – Puzzle Guide
If you’re looking for the solution to a puzzle in Call of the Sea, you’ve come to the right place. This guide lists solutions to each chapter’s puzzles. Spoilers ahead. It’s not a full walkthrough—story beats are omitted.

Chapter 1
The first chapter has a single puzzle. Find four red totems with different symbols; Norah will sketch them in her journal. Arrange the symbols to “make sense” vertically: fish below the sea, then the sea, mountains, birds, and the sun highest.
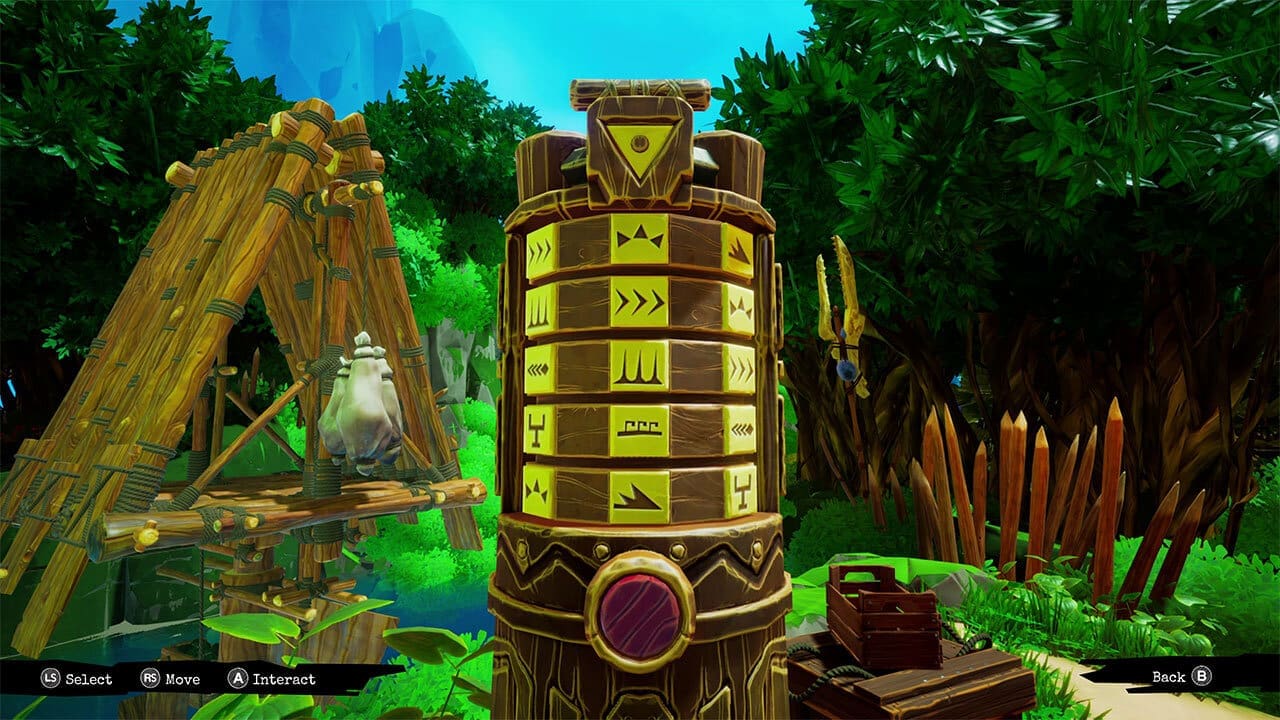
Chapter 2
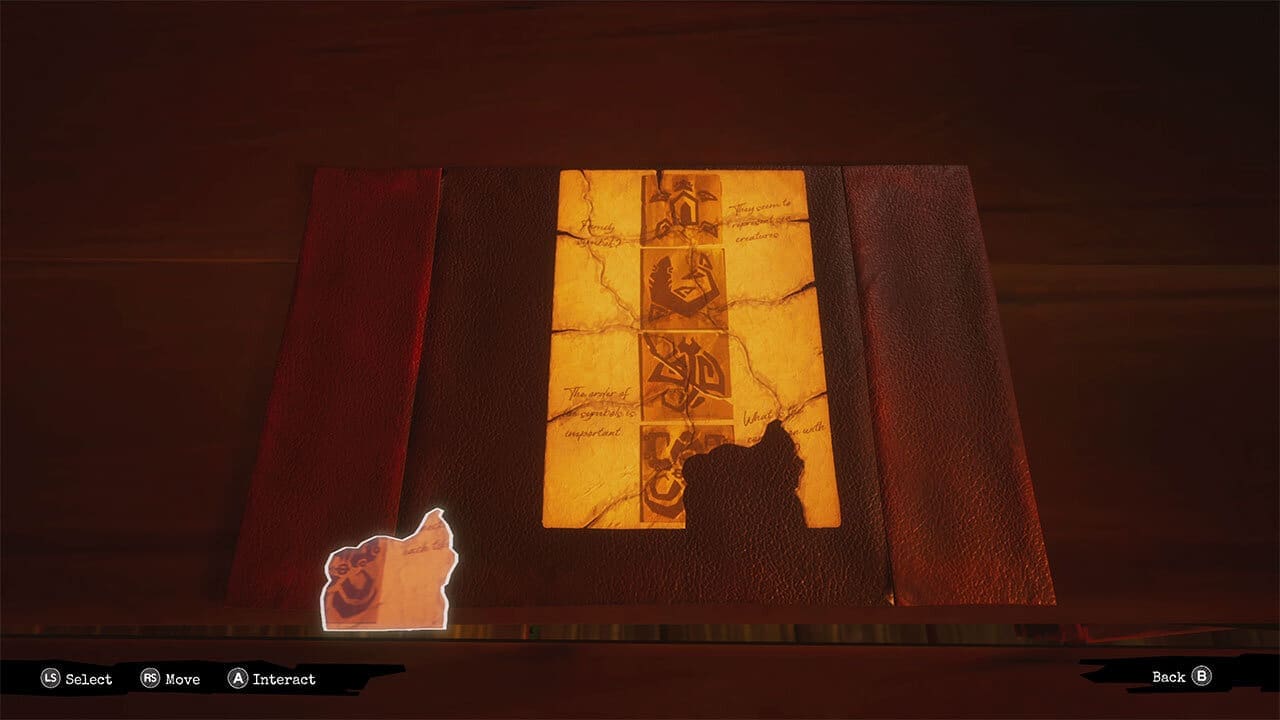
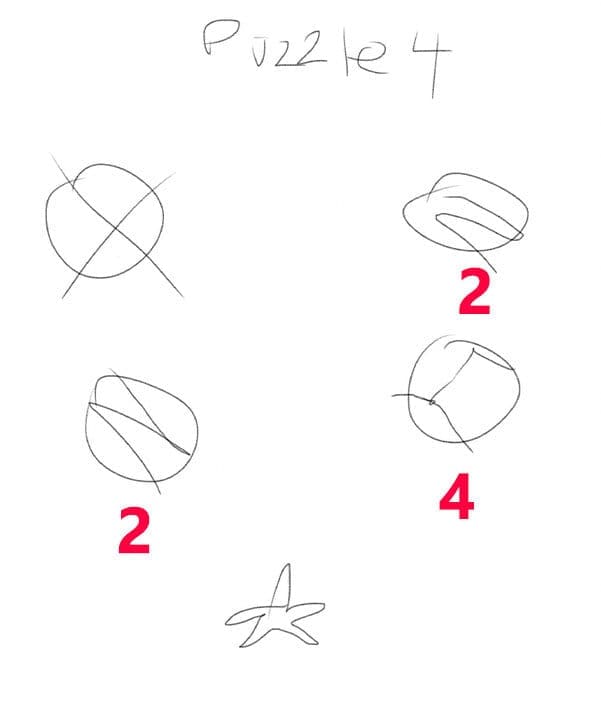
Examine the three huts near the start to note their totems; find the fourth totem behind the left hut (through bushes). Go up to the two cliff huts. In the first, reassemble the torn paper image:
Use the central hut’s totem and match one symbol from each totem based on the repaired image:

Take the device from the secret compartment and ride the lift (right from the chapter entrance). In the excavation, interact with three whispering wall holes to add three eye sketches. Back by the cliff hut, use the burn-hole machine to match the journal eyes:

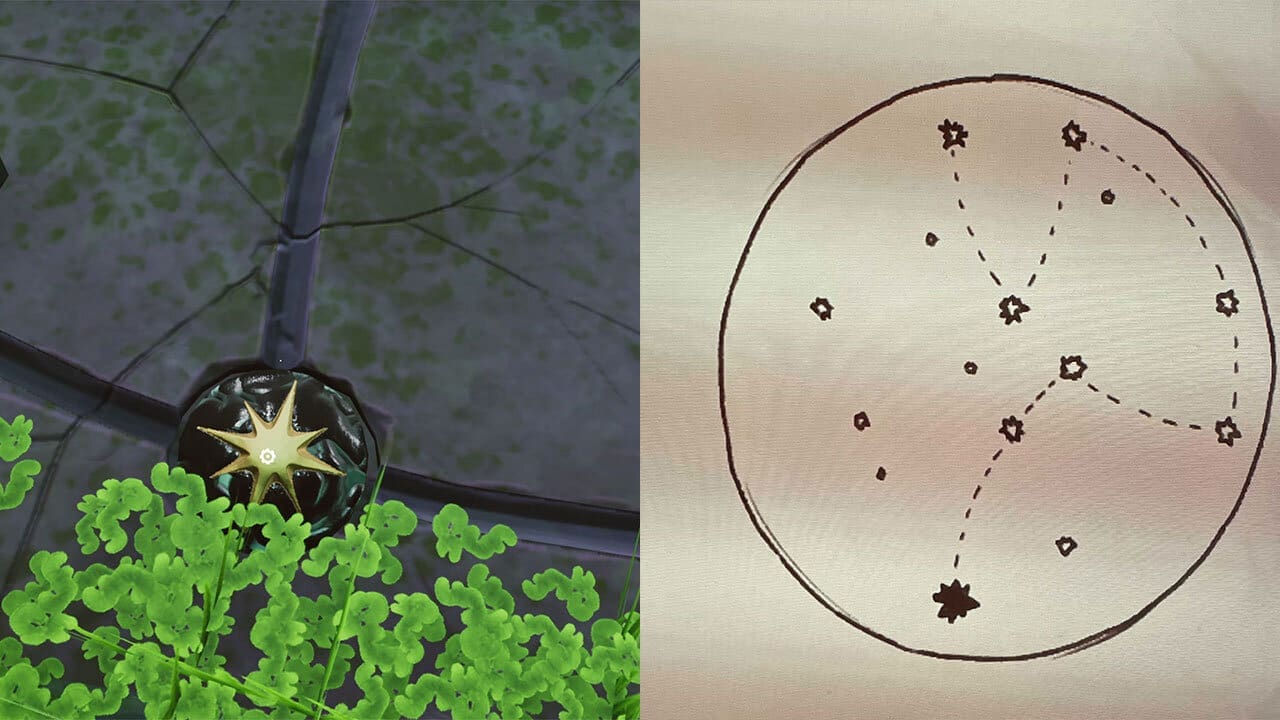
Put the burnt lens on the hut’s telescope to get a star map in the journal. Return to the excavation and step on the floor switches in order, starting from the bright-star icon:
Chapter 3
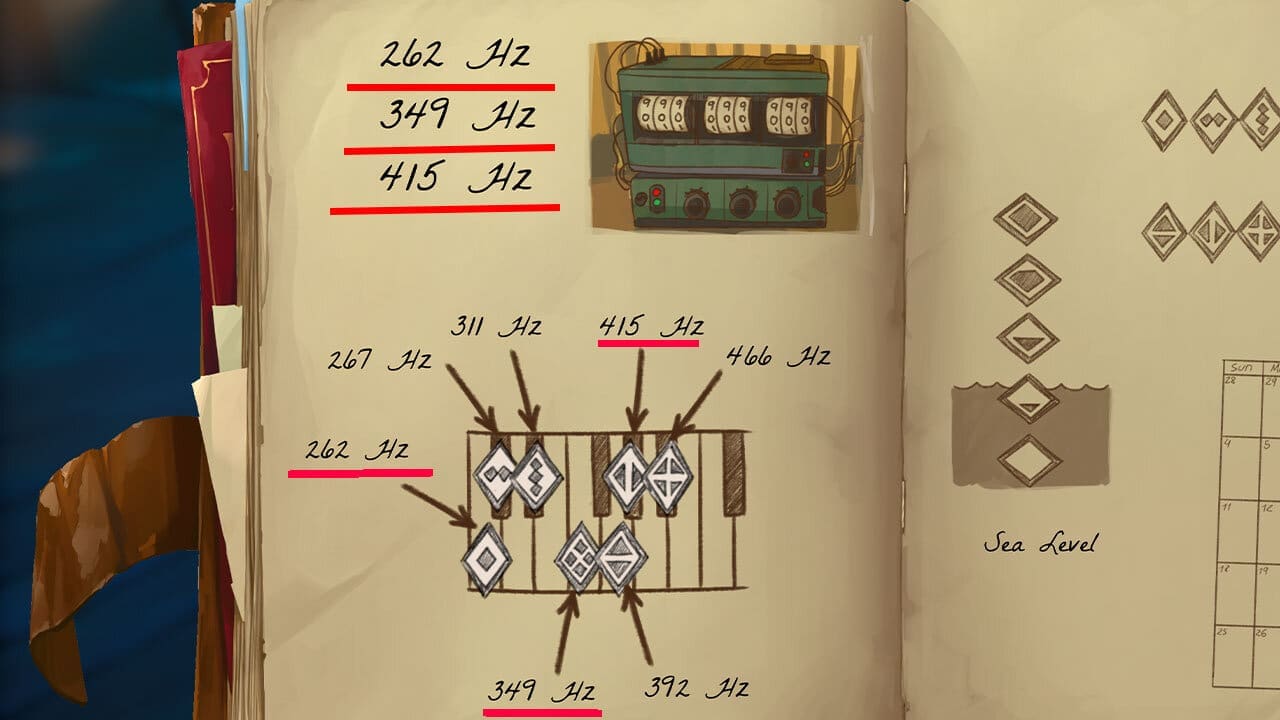
In the ship, power the generator by pulling levers in order: 3, 2, 4, 1. Solve the three-rock resonance so all three green symbols light at once; note the three numbers Norah records.
Power the outside camp and the cave via switches. Find the calendar behind the ship, note the water-level mark on the right stairs near the main pit, then use the projector in the small cave (slide 3 matches the water mark). Press each keyboard key left to right to map symbols.
Match the three recorded numbers to keyboard symbols, then translate via the water-level chart. Open the three matching valves (leave others closed). Set the big pit valve to the solid black circle (new moon; in-game date Nov 7). Activate the pedestal to proceed.

Chapter 4
Press one correct button on each of four stone tablets (three in the main area; one fallen in the ruined camp right of the entrance). Use the large floor symbol before the locked door to decode which button to press on each tablet.
Compare the floor symbol with the tablet face (example shows the crossed-line symbol ⇒ press the bottom button):
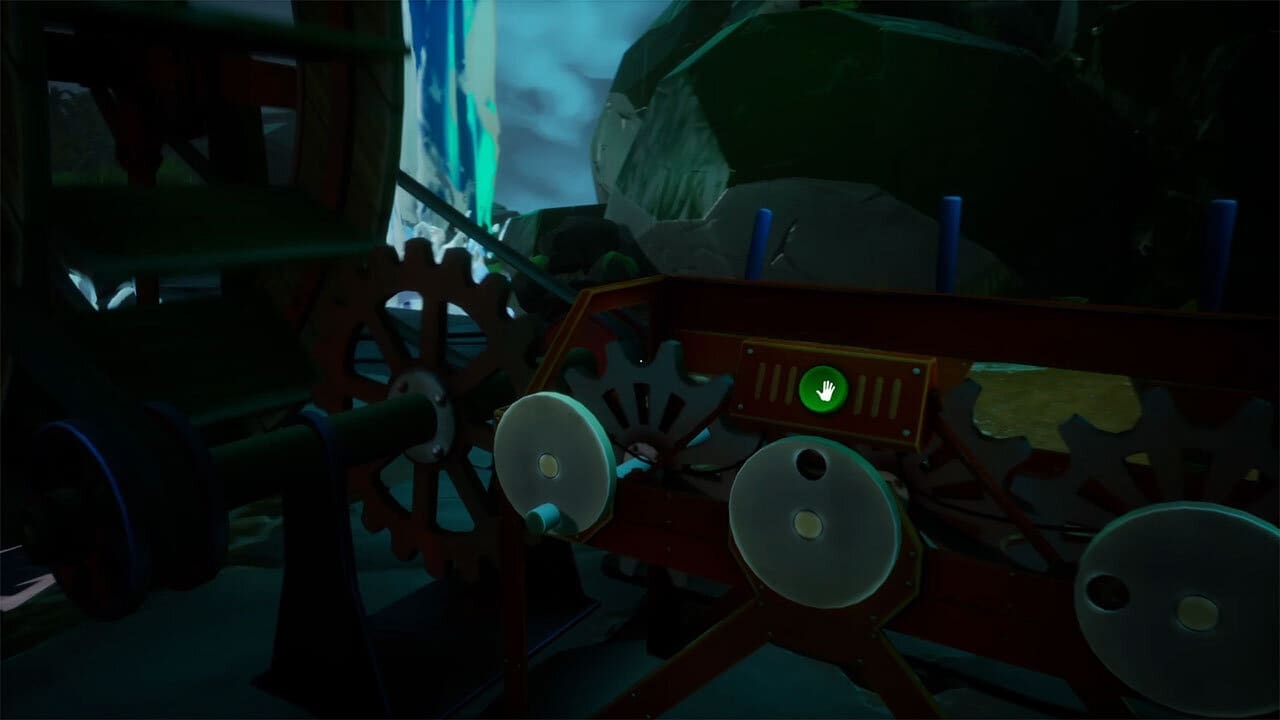
This starts the generator behind the waterfall. Rotate each rear gear so its hole is at the bottom, then pull the lever:
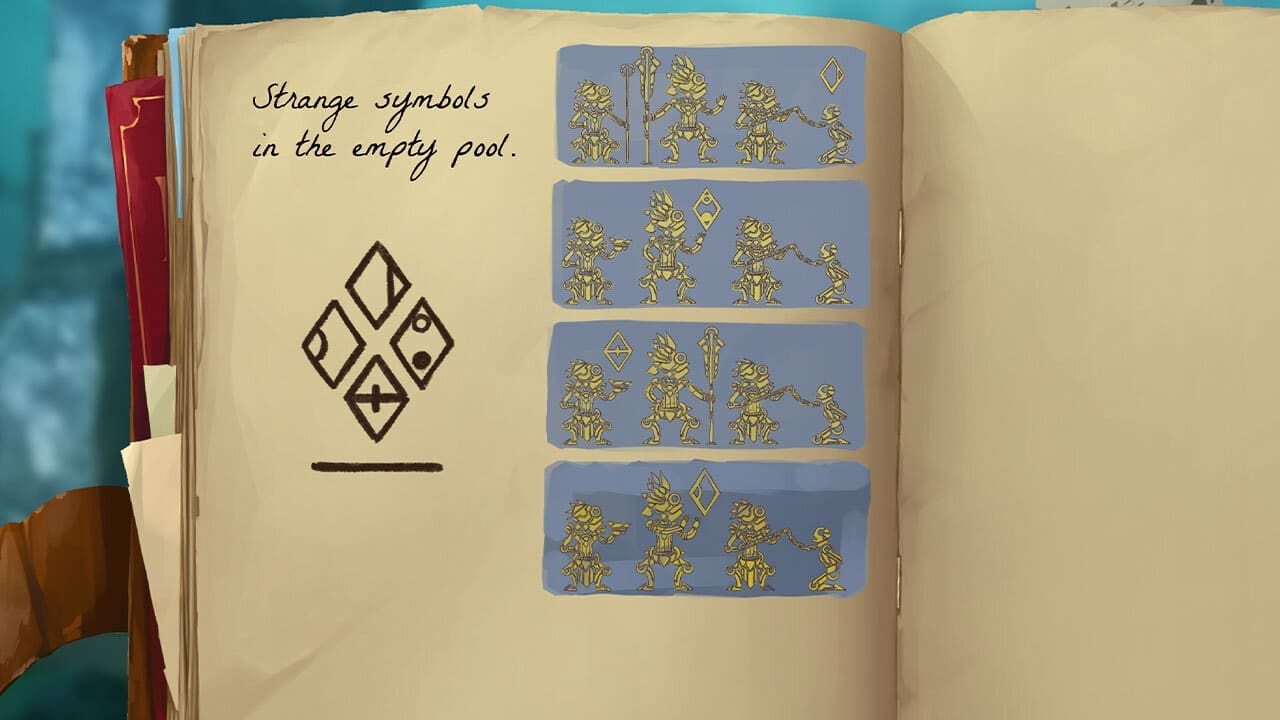
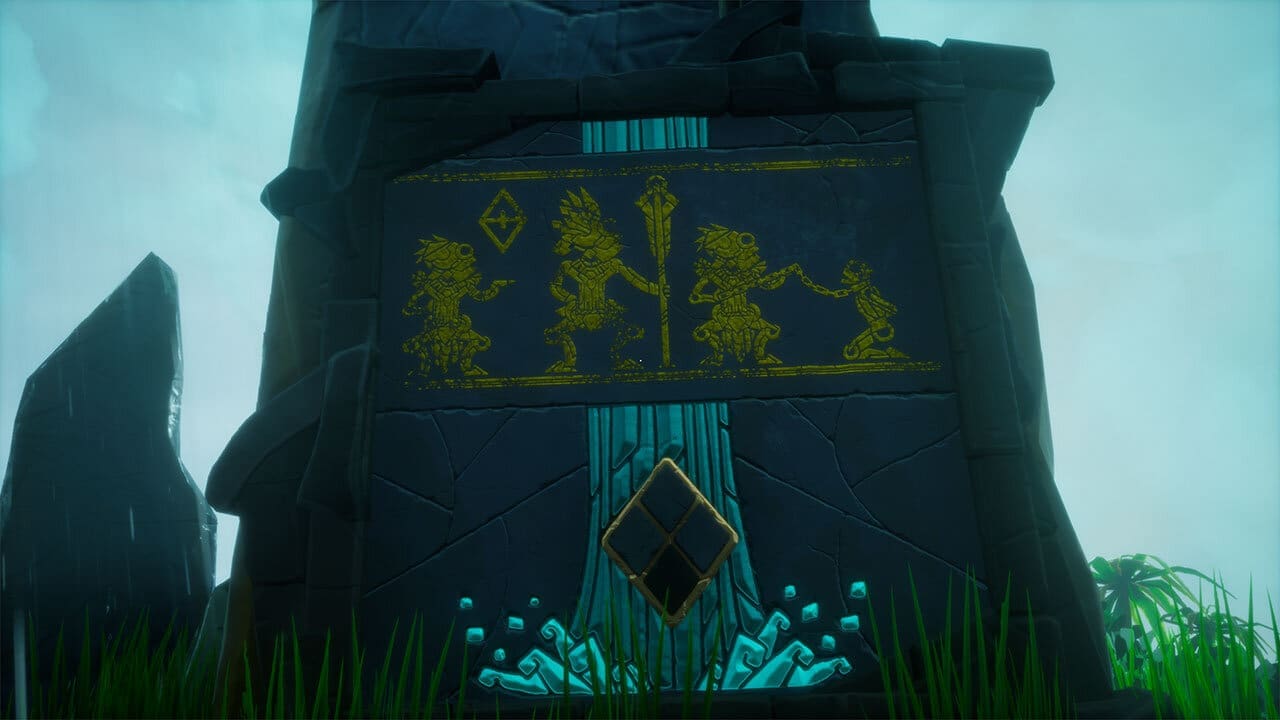
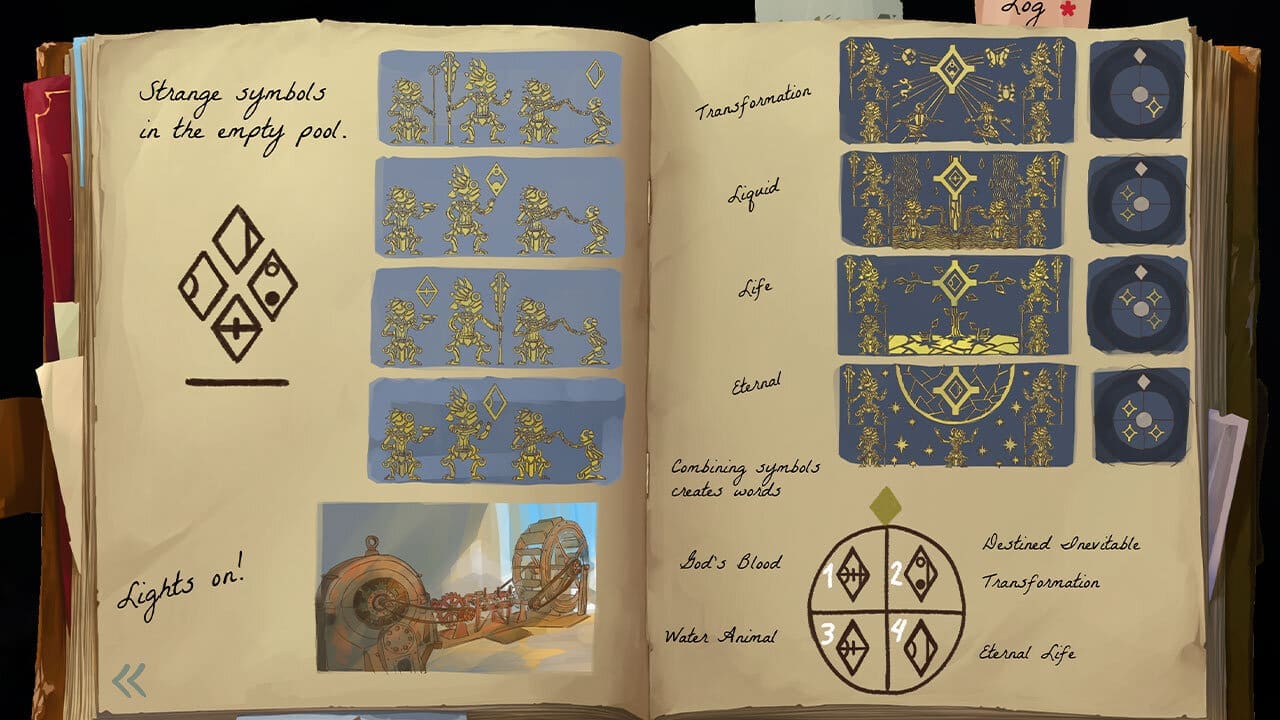
In the mural room, set dials (clockwise starting from the shown mural) to positions 1, 2, 3, 3 based on journal notes (“Transformation = God’s Blood”, “Liquid = Transformation”, “Life = Water Animal”, “Eternal = Water Animal”).
Final drum puzzle (drums left→right are 1–3). Reply sequences:
- 2
- 1 – 3
- 2 – 3 – 1
- 1 – 2 – 1
- 3 – 3 – 1 – 2
- 1 – 3 – 3 – 2 – 2 – 2
Chapter 5
Chapter 5 is mostly swimming with timing-based current puzzles. The main mechanic is switching water flow so paired buttons meet in the middle at the same time to open doors or move objects.
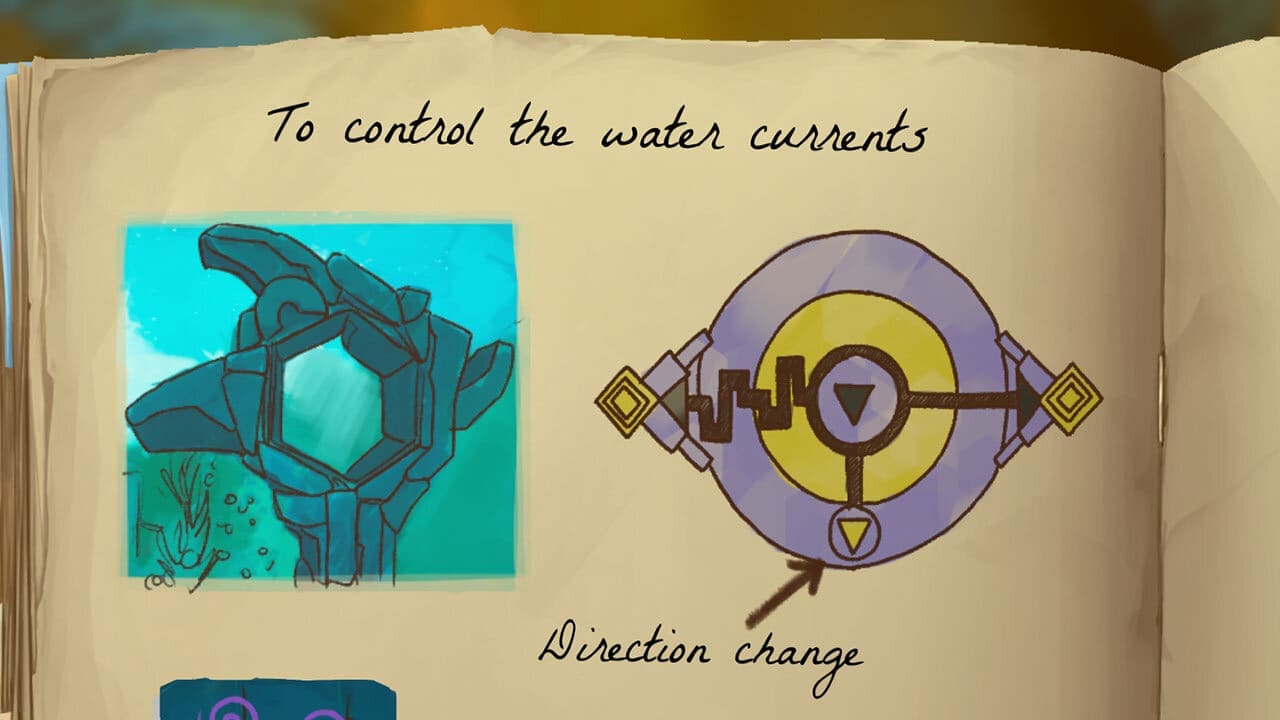
The final instance is the most complex; use it as a template for earlier ones.
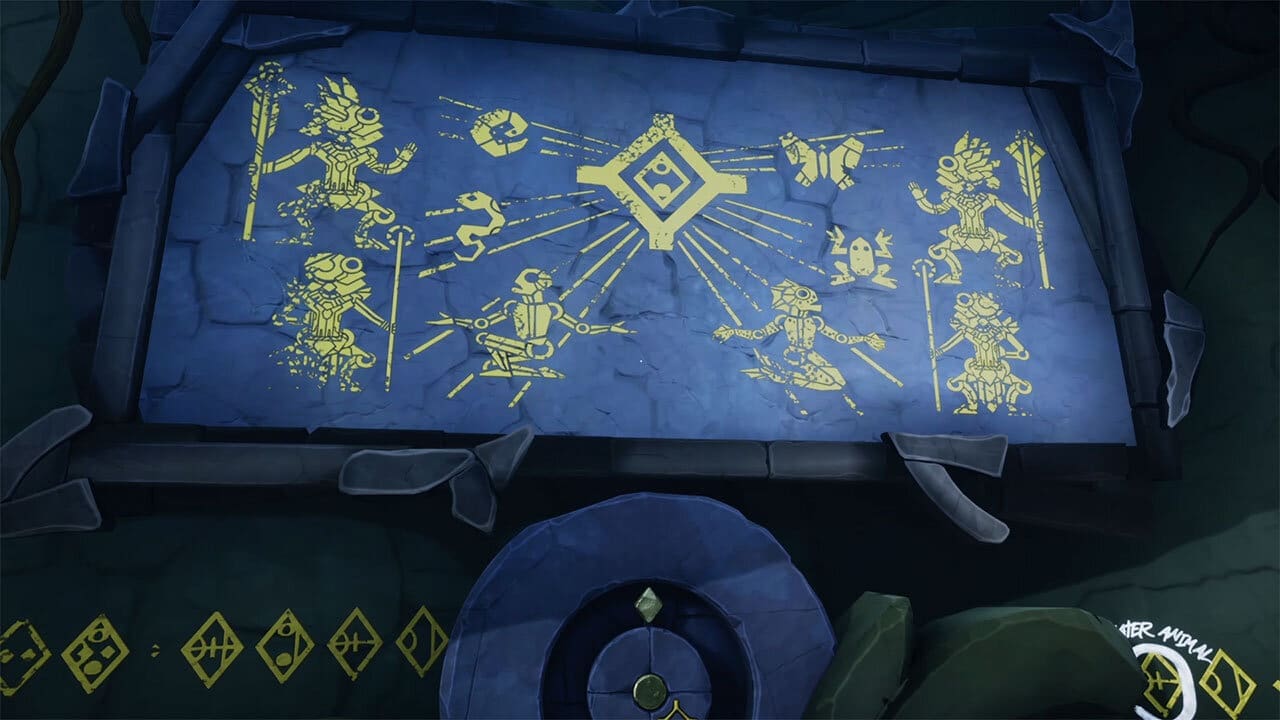
In the large hut area, activate five totems in the correct order. You’ll find that order on a pole in the lower section; Norah adds the symbols to her journal.
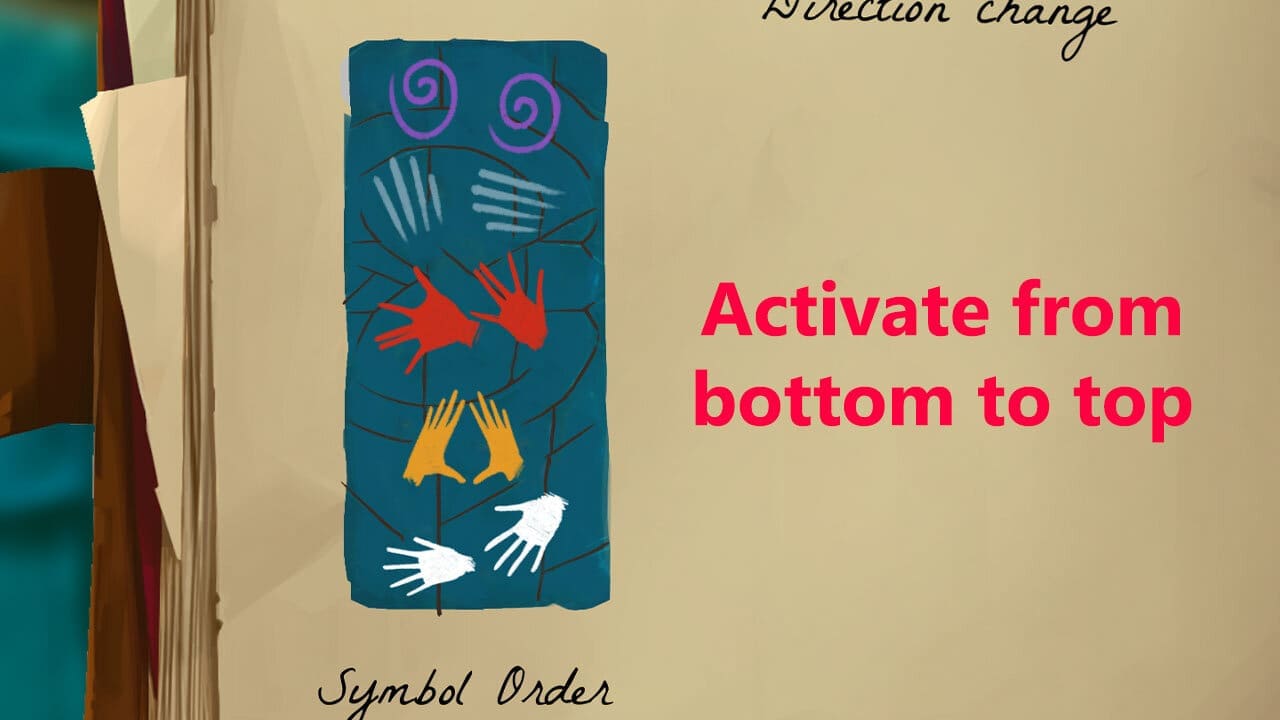
Match each totem by the symbol(s) on or near its hut. Activation order:
- White hands (left of the area entrance)
- Orange hands (very top level)
- Red hands (one level down from orange)
- Line marks (right of the area entrance)
- Purple swirls (straight ahead from the entrance)
After all five, press the switch outside the purple-swirls hut.
Chapter 6
Everything is under one roof. First, go right and insert your hand into the stone circle to receive your first tattoo/symbol. Use your blood on the tablet before the pyramid to open it.
Inside, press the two wall buttons to drop four symbol circles in the center. Inspect the constellations on the four doors; they’re added to your journal. Each completed door grants a new tattoo, unlocking an additional symbol for the floor circles.
Stand on the star near the entrance to align your viewpoint for laying out constellations.
Door 1: With only the first symbol available, you can open the bottom-right door (as viewed from the star). Activate the circles per this layout:

Enable the circle to your left and the two on the right; leave the far-left circle off. Collect the second tattoo/symbol inside.
Door 2: Turn all symbols off, return to the star, and open the last door on the right with this layout:

Inside is a statue-rotation bridge puzzle:
- Use the near controls to rotate the front black statue so one face points toward you and another to the right.
- Rotate the opposite black statue so it faces the first, forming a bridge; press the big button to extend platforms.
- Cross and use the far controls to rotate the white statues so they’ll align when you re-adjust the black ones.
Collect the third tattoo/symbol.
Door 3: Back at the star, open the bottom-left door (small constellation) with this layout:

Collect the fourth tattoo/symbol.
Door 4: Only one door remains; use the newly unlocked symbol set to open it (layout continues in next chunk).
Chapter 6 — Final Door
The big door has no wall constellation. Look up at the sky to find the pattern you must recreate on the floor.
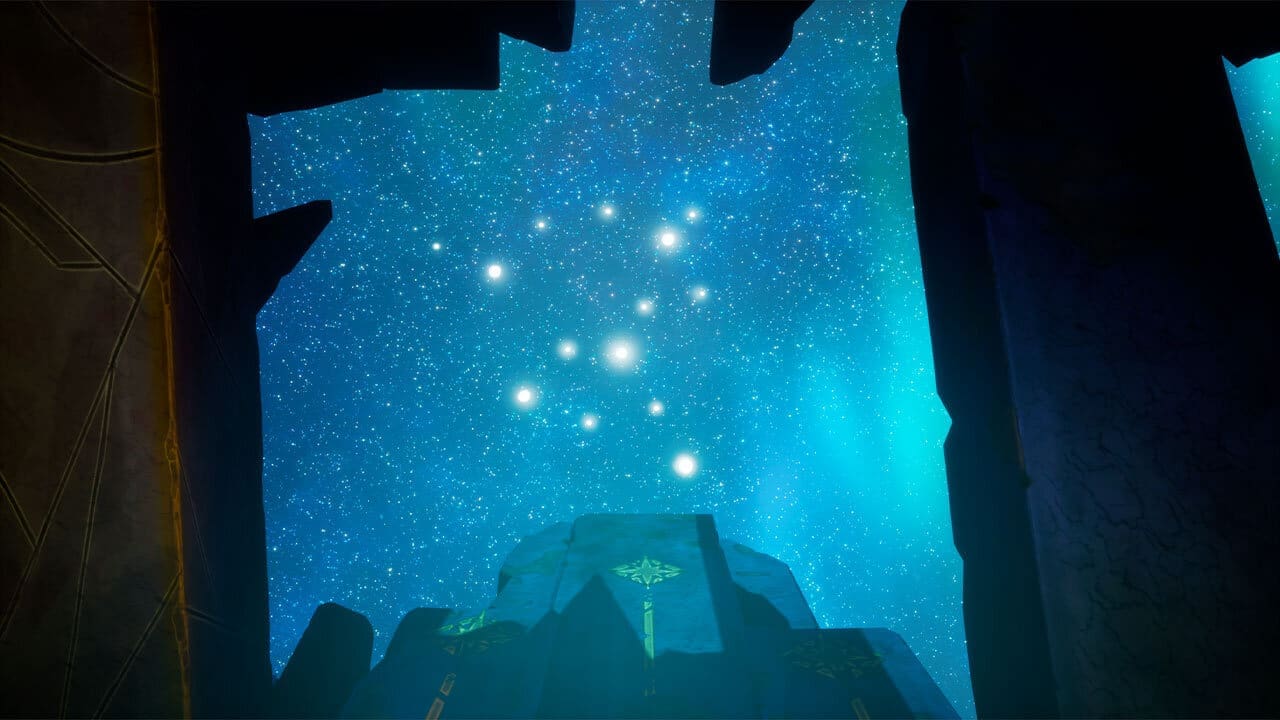
Here’s the floor layout for the final solution:

That’s it—head through the door to the end. No more puzzles.
Thanks!
I hope this guide helped. Share it with friends who might be stuck on Call of the Sea!


I cant find the symbol with just a diamond on it